
I ran across this blog post and thought that it might be a good one to post for any beginners who may be reading.
"One of the most commonly asked questions by those who are just learning the makeup basics is, "where do I place the different eye shadows on my eyes?" " Where do the makeup eye shadows actually go on the eye?" "Which way is the correct way to put on eye shadows?"
Well,simply put...they all are!
There are many different styles and looks you can create by careful shadow placement. From simple color washes to eccentric multi-colored looks. Not all eye shapes are the exact same, but this is a general break down that will work for all eye types.
The eye is basically broken down into the following sections.
Lets start with your eyelid,
The movable part of your eye area that is usually seen with color when you blink.
The eyelid can be broken down into three separate sections.
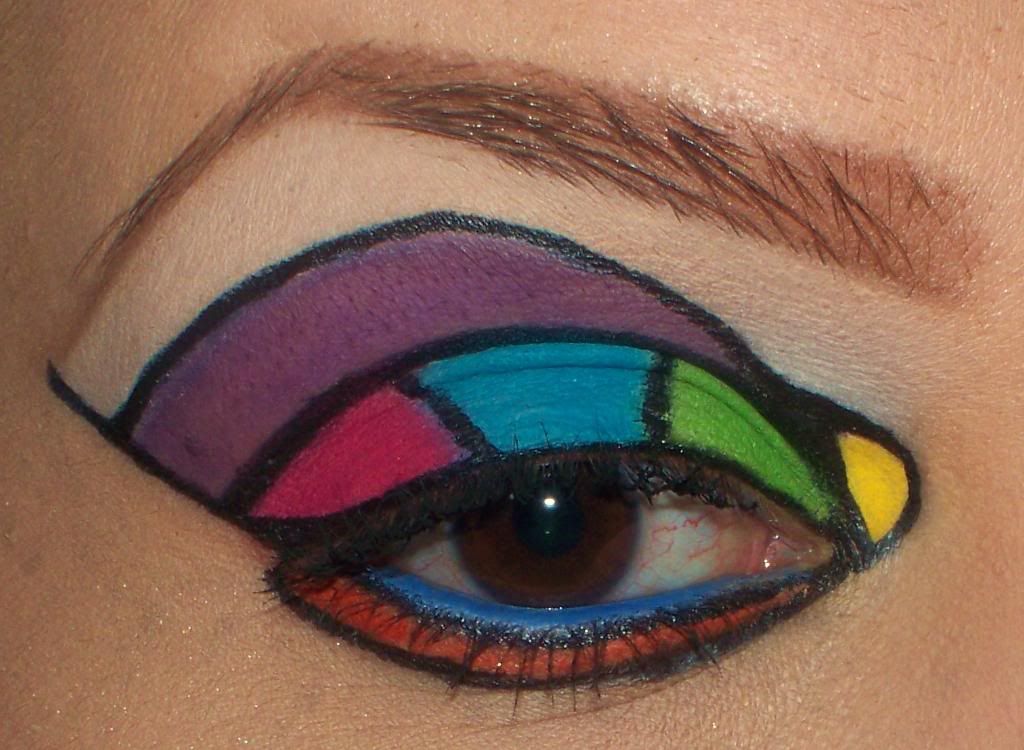
The Outer Lid #1- RED
is the part of your lid that covers from the edge of your eye in towards the edge of your iris. This is generally where you place the darkest shade.
The Middle of your eye lid #2- BABY BLUE
is your lid above your iris. This is where a medium toned shadow is generally placed.
The Inner part of your eyelid #3- LIME GREEN
is the inner part of your eyelid going towards the edge of your iris. This is where the lightest shadow on the eyelid is placed.
The Crease – is the area above your eye lid and below your brow bone area, along the eye socket/bone. This is where a dark color is blended into your eyeshadow below.
The Outer V- YELLOW
is the small area from your lower lash line up towards your brow, blending inwards towards the crease. The darkest of colors generally goes here.
Brow Bone - The brow bone sometimes has another colour or shade applied here and blended well into the crease, depending on the look.
The Highlight Area – CREAM/IVORY
The highlight area is found directly below your eyebrow. This is where a light wash of very light color is used to highlight the brow area.
The Lower lash line - DARK BLUE
is found directly below your eyelashes, under your eye. Depending on the look you are going for, a small line of color or black, gray or brown pencil may be used to circle the eye somewhat.
The Waterline- this is the part of your lower eye lid, that gets pressed together with your lashes when your eyes are closed. Not everyone is comfortable with wearing makeup there and some professionals advise against it, because of how close to your eyeball it is. This is where some ladies will place a line of pencil in a dark color or even white, to brighten the eye. Be careful when placing any sort of makeup so close to the inner eye and tear duct as you may harm your eye area. Not all makeup artists recommend lining the tear duct for health reasons.
Pick Your Style
Depending on the style of eye makeup you are after you can pick and choose which part of your eye are separated with color, and which aren’t. Not all eye looks are broken down so much.
Example, a simple wash of color over the entire eyelid is a common look, rather then breaking it into 3 sections. Find a look that works for you.There are no rules when it comes to makeup, this is only a guideline. A good rule of thumb is to stick with shades in one color range when starting out.
It is a lot easier to develop a nice look with shades very similar together, than using different colors.
i.e. Use 3 tones of blue, a dark, a medium and a light. Instead of trying to use blue, purple and pink.
Some More Makeup(Eye Shadow) Tips:
Always be sure to use clean brushes and applicators.
Make sure that any makeup item such as sparkles, shadows, pencils….are made for the eye area. Not all makeup products are safe to wear so close to the eye so be sure to read the labels. Eyeshadow powders are used all over the eye area. Pencil is used to line your lashes and cream shadows are used on your eyelid.
Lastly the key to fabulous looking eyes is blending! Blend, blend and blend some more. This is the part you don’t want to forget, it will bring all the shades together nicely and give a beautiful finish to your look.
Keep in mind these are simply guidelines and there are many different looks you can come up with, these are just areas you will hear commonly referred to or talked about in tutorials.
Makeup is all about self expression, so experiment, be creative, and most importantly have fun.
Thanks for reading beauties

Danielle
No comments:
Post a Comment