NOBODY TELLS THIS TO PEOPLE WHO ARE BEGINNERS, I WISH SOMEONE TOLD ME.
All of us who do creative work, we get into it because we have good taste.
But there is this gap. For the first couple years you make stuff, it’s just not that good.
It’s trying to be good, it has potential, but it’s not.
But your taste, the thing that got you into the game, is still killer. And your taste is why your work disappoints you.
A lot of people never get past this phase, they quit.
Most people I know who do interesting, creative work went through years of this.
We know our work doesn’t have this special thing that we want it to have. We all go through this.
And if you are just starting out or you are still in this phase, you gotta know its normal and the most important thing you can do is do a lot of work.
Put yourself on a deadline so that every week you will finish one story [or project].
It is only by going through a volume of work that you will close that gap, and your work will be as good as your ambitions.
And I took longer to figure out how to do this than anyone I’ve ever met.
It’s gonna take awhile.
It’s normal to take awhile.
You’ve just gotta fight your way through.
-Ira Glass
“I was hoping that through helping people see the beauty in themselves, I could try and find it in me.” -Kevyn Aucoi
Tuesday 10 July 2012
In The Beginning
Tuesday 20 March 2012
Guide To: Essential Oils
Hello Beauties,
Saddle up, this is going to be a long one!
As part of my course I am also studying essential oils and all the amazing healing properties that they have. This post is going to be about some of the most common essential oils and the different amazing things they can do for the body.
Please understand that this is meant to be taken as a GUIDE ONLY, and that further independent research should be done if you want to start healing with essential oils. Secondly, essential oils are not meant to be placed directly on the skin without being diluted in a carrier oil; as they penetrate into the blood stream and can have the opposite effect of what you want. You also have to be very careful about using essential oils on the skin when you are pregnant as some oils can cause harm to the fetus. Lastly you must use ALL NATURAL essential oils, synthetic essential oils can make you very sick and will often have the opposite to desired effect on your body.
I am going to break the oils down into 3 different categories soothing, grounding, and stimulating.
Soothing
Lavender
Properties
Fresh herbaceous- floral, balsamic undertones
Native to the high mountains of southern France
bathing, soothing, disenfecting
soothing to the nervous and digestive systems
Therapeutic Uses
1 drop of oil to 1 cup of water as an antiseptic
Lavender, chamomile, bergamot, neroli, into a carrier oil helps with eczema, psoriasis
Lavender and rosemary for healthy hair
Up to 20 drops in the tub for soothing bath
Lavender and geranium or eucalyptus to stimulate the immune system
A few drops placed on a warmer before bed to sooth/calm
Chamomile
Properties
Sweet, fruity, herbaceous
Native to Hungary & Egypt
Over 100 uses (national institute of health)
Calming, soothing
Helps sooth headaches & migraines
Good for allergies and sensitive skin
Therapeutic Uses
Used with lemon or honey for sleep
helps with ear aches/infections
Chamomile, honey, rose, sandalwood, geranium in distilled water for sensitive skin
Blends well with bergamot, clary, sage, lavender, jasmine, geranium, grapefruit, tea tree, rose, lemon, lime and yang-ylang oil.
Jasmine
Properties
Powerful, warm, floral, herbaceous-fruity undertones
Native to Egypt & Turkey
Vines are from the olive family
Considered an aphrodisiac
Therapeutic Uses
Can be used in wound healing
Acts as an antidepressant
Considered an antiseptic
Blends well with bergamot, sandalwood, rose
Also blends with citrus fruits such as orange, lemon, lime and grapefruit
Ylang-Ylang
Properties
Powerful, sweet, floral
Native to Commores, Indonesia, & Philippines
Oils derived from flowers of a tropical tree
Therapeutic Uses
Can be used as a sedative
Considered to be an aphrodisiac
Soothes insect bites
Blends well with bergamot, grapefruit, lavender and sandalwood
Grounding Oils
Geranium
Properties
Powerful, green-leafy, rosy with fruity undertones
Native to southern Africa
AKA Cranesbill, storkesbill
Calming, balancing, uplifting
Antioxidant, Antiseptic, Astringent
Therapeutic Uses
Refreshing bath oil
Blends well with rose, citrus, basil
Commonly found in cosmetics as an astringent
Good for oily/dry skin
1 drop in 1 cup of water can be used to treat sores around the mouth and eyes
Can be used on a warmer to cleanse the air
Cypress
Properties
Sweet, balsamic, reminiscent of pine needles
Native to Cypress Island
Considered a "supportive oil"
Therapeutic Uses
Astringent and contractions good for teeth, skin and muscles
Cypress/ Hyssop for relief of hay fever
Antiseptic for internal and external wounds
Good for oily skin
Best in a warmer in the winter
Sandalwood
Properties
Soft, woody, persistent
Native to India
Used for everyday religious rituals
Used for embalming (believed to carry the soul into the next life)
Therapeutic Uses
Grounding
Acts as a memory booster
Used in sensitive skin care
Used in eczema treatments
Can help with over exposure to sun
Used to help with fever, burns, and to reduce sweating
Blends well with bergamot, black pepper, geranium, lavender, myrrh, rose, vetiver and ylang-ylang
Stimulating
Eucalyptus
Properties
Pungent, camphoraceous, spicy
Native to Australia
Worlds fastest growing trees
Cough,cold and sinus remedy
Therapeutic Uses
Can be inhaled or rubbed on the chest as a respiratory aid
Blends well with juniper and lavender
Effective rub for joints and muscles
Can be used as an antiseptic bath
1 drop with honey, or on a sugar cube can be used as an antiseptic / diuretic
Can be used on a warmer during flu season
Rosemary
Properties
Fresh, herbaceous, woody
Native to Mediterranean region
Associated with mind, body, adrenals, and memory
Therapeutic Uses
**CAUTION** NOT DURING PREGNANCY (Seizures and high blood pressure)
Blend with lavender for hair conditioner
1 drop on top of the head in the shower as a stimulant
on a warmer in the morning
Very strong stimulant
Brain and nerve tonic
Blends well with frankincense, lavender, clary, sage, cedarwood, basil, thyme, citronella, lemongrass, elemi, geranium, chamomile, peppermint and cardamom
Lemon
Properties
Fresh, sweet, reminiscent of the peel
Native to Asia
Stimulates the nervous system
Therapeutic Uses
Antiseptic, bactericidal
Detoxification and purification for the body
Astringent for infectious diseases
Treats wrinkles and brown spots
Lemon with olive oil or honey in water speeds up the digestive system
Lemon and water for detoxification
On a warmer to stimulate
Blends well with lavender, rose oil, neroli, sandalwood, geranium, ylang-ylang, tea tree oil
Peppermint
Properties
Powerful, minty, herbaceous, balsamic, sweet undertones
Native to Europe and Asia
Referred to as the worlds oldest medicine
Therapeutic Uses
Good for respiratory system
Antiseptic, sedative and cooling properties
Contains mineral nutrients
Good for indigestion and upset stomach
Blends well with eucalyptus, rosemary, lemon and marjoram
Tea Tree
Properties
Warm-spicy, fresh, camphoraceous
Native to Australia
Therapeutic Uses
Antibacterial, antimicrobial, antiseptic, antiviral, fungicide
Zit zapper
Can be added to laundry to remove odours
Added to shampoo to prevent head lice
blends well with cinnamon, clary sage, clove, geranium, lavender, lemon, myrrh, nutmeg, rosewood, rosemary, and thyme
Hope this was helpful
Thanks for reading beauties
Danielle
Wednesday 14 March 2012
How To: Conceal a Tattoo
Hello Beauties,
Tattoos are beautiful pieces of art as well as tools of self expression; but let's face it, not everyone likes them. There is still a certain stigma attached to having a tattoo and there may come a time when you find yourself in need of a way to cover a tattoo (a family gathering perhaps ;P).
Covering a tattoo is all about layering, usually it takes about 3 layers to completely cover a tattoo. The degree of difficulty for covering a tattoo depends on 3 things :
You will need:
Tattoos are beautiful pieces of art as well as tools of self expression; but let's face it, not everyone likes them. There is still a certain stigma attached to having a tattoo and there may come a time when you find yourself in need of a way to cover a tattoo (a family gathering perhaps ;P).
Covering a tattoo is all about layering, usually it takes about 3 layers to completely cover a tattoo. The degree of difficulty for covering a tattoo depends on 3 things :
- The size of the tattoo
- The skin colour of the person with the tattoo
- The number of colours that the tattoo has within it
You will need:
- A foundation brush
- A concealer brush
- Corrector
- Concealer
- Foundation
- Setting powder
- Moisturizer
- Cleansing wipes
- Primer (Optional)
- A colour wheel (optional, but good to have)
To Start, Prep the Skin:
To prep the skin, wipe the tattooed area with a cleansing wipe, then apply moisturizer and let it absorb for 5 minutes. Once the moisturizer has absorbed into the skin apply a primer (I use GOSH velvet finish primer), if you're not using primer then apply a corrector to the tattooed area.
**To Choose a Corrector** - Look at the person's skin tone, determine if they have a warm, or cool undertone (pink, or yellow undertone). Choose a corrector that is slightly more pink, or slightly more yellow than the persons skin. Then choose a corrector that will cancel out most of the colour in the tattoo (IE, for a black tattoo on fair skin, try using a white eye shadow base). You don't have to buy a corrector palette to make this work, you can use a concealer to act as a corrector. My Pick - MAC Studio fix foundation and concealer
The first layer should be layer that cancels out the colour in the tattoo (IE white layer for a black tattoo). While applying the corrector, make sure to concentrate the product in the center of the tattooed area; you want to make sure you have room to blend the product out. I like to use a sponge for the first layer; Remove some of your chosen corrector with a spatula, or the tip of your brush and apply it to the center of the tattooed area. Take a sponge and dab through the product to the outer edges of the tattoo. Once there is a good layer of product covering the tattoo (at this stage the tattoo should be visible, but not prominent) cover the entire area with a finishing powder. My pick - MAC prep and prime loose powder, I like the loose powder because you can sprinkle it onto the tattoo and brush away the excess without moving any of your corrector away. Give your first layer a few minutes to set before you begin applying the next.
Once the corrector has been set, begin to apply your concealer with your concealer brush. As with the first layer, try to concentrate your product on the center of the tattooed area so you have room to blend out.
**TIP** - Try to avoid over touching the concealed area with the brush, the more you touch it, the more likely it will be to smudge and remove product
At this point, the tattoo should not be visible, powder the concealer layer and give it a few minutes to set.
Once the concealer is set, go over the area with foundation that matches the skin tone. As with all the other layers, start in the center of the tattooed area and blend out using gentle brush strokes. Touching the area to much or too briskly will remove product and smudge the layers. Powder the entire area and wait a few minutes to set.
Don't be shy about adding extra layers, if you notice that one of the layers didn't cover the way you wanted them to, powder, and repeat that layer using the same steps.
To finish the look (if you think you need it) try adding some bronzer. Gently sweep bronzer over the concealed area to add some life.
.jpg) |
| Before |
.jpg)
 |
| After |
Thanks for reading
Danielle
Monday 12 March 2012
How To: Make at Home Facials
Hello Beauties,
For All Skin Types
Brighten: Cut a slice of ripe papaya and remove the seeds and pulp (save the pulp for a snack later—it’s great for digestion). Rub the inside of the papaya peel on your cleansed face, focusing on lines around the mouth and eyes, crow’s feet, thinning temples, neck and hands. Let it dry for 15 to 20 minutes, then rinse with tepid water. This mask can be done twice a week. “The enzymes in papaya exfoliate, repair sun damage, diminish age spots and smooth skin. Your skin will look brighter, with a more polished finish,” says Macan-Graves.
Exfoliate: Combine 1 tsp honey and 1 tsp olive oil. Separately, prepare a packet of plain oatmeal, using less water than called for so it forms a thick paste. Next, add the honey and olive oil mixture to the cooked oatmeal. Apply as a scrub, gently rubbing it in small circles over your skin, avoiding the eye area. Rinse off with warm water and pat dry. This mask can be done twice weekly. “The oatmeal in this scrub exfoliates, while the honey and olive oil moisturize,” says Argenti.
Cleanse: “Believe it or not, I love to cleanse with oil,” says Argenti. For this facial, she combines 1 Tbsp plain Greek yogurt with 2 tsp olive oil and 1/2 tsp lemon oil (not to be confused with lemon juice; lemon oil is an essential oil that can be found at health food stores). The mixture should be a little bit runny but not easily poured out. Massage it over skin, then immediately wipe it off with a washcloth soaked in tepid water. This can be done daily. “You want to use good-quality oil and you’ll be surprised at how clean your skin will feel,” says Argenti. “You don’t need a harsher product, even for skin with acne. Just be careful around the eye area…[the mixture] tends to be very sticky.”
For Oil- and Blemish-Prone Skin
Lift & Tighten: Combine 2 Tbsp plain yogurt with 1 Tbsp fresh lemon juice (the juice of one lemon) and apply to your cleansed face and neck. Let it dry for 20 to 30 minutes. You’ll feel the mask tighten on your face and neck, which creates a lifting and firming effect. Leave it on longer (up to one hour) for even more face-lifting effects. Once done, rinse with tepid water followed by a cool rinse. This mask can be done two to three times a week or whenever you need a face lift. “This instant face-lifting mask helps fade age-spots, acne scars and even helps keep blemishes and acne in check. It also gets rid of uneven-looking skin tone,” says Macan-Graves.
Tone: This toning eye treatment helps to “de-puff, relax, refresh and energize your skin,” says Argenti. “It’s much more cooling than the traditional cucumber slices.” After cleansing your skin, brew a cup of chamomile or green tea and allow it to cool. Then soak two clean, round makeup sponges in the tea and squeeze out any excess liquid. Place one on each of your eyes for 15 minutes. Do this daily. “You need to use an alcohol-free toner on your skin to cleanse and tighten pores. Alcohol is very detrimental, and tea works just as well,” adds Argenti.
For Dry Skin
Soothe: Combine 2 Tbsp honey with 1 Tbsp apple cider vinegar or lemon juice. Apply to your clean face and leave on for 20 minutes. Rinse with tepid water followed by a cool rinse. This can be done three times a week. “This mask heals, moisturizes and balances the pH of the skin,” says Macan-Graves. “Honey is a humectant and natural antibiotic that heals and moisturizes. Apple cider vinegar helps balance the pH of skin and soothes damaged skin.”
Let mek now if you try any of these out. I'd love to hear your reviews of them :D
As always, Thanks for reading beauties,
Danielle
Facials are a great way to keep your skin glowing, but they can be pricey. We asked Louisa Macan-Graves, author of Hollywood Beauty Secrets: Remedies to the Rescue, and Elda Argenti, owner of the Plantogen skincare line, for their favorite make-at-home face masks crafted from common household ingredients.
For All Skin Types
Brighten: Cut a slice of ripe papaya and remove the seeds and pulp (save the pulp for a snack later—it’s great for digestion). Rub the inside of the papaya peel on your cleansed face, focusing on lines around the mouth and eyes, crow’s feet, thinning temples, neck and hands. Let it dry for 15 to 20 minutes, then rinse with tepid water. This mask can be done twice a week. “The enzymes in papaya exfoliate, repair sun damage, diminish age spots and smooth skin. Your skin will look brighter, with a more polished finish,” says Macan-Graves.
Exfoliate: Combine 1 tsp honey and 1 tsp olive oil. Separately, prepare a packet of plain oatmeal, using less water than called for so it forms a thick paste. Next, add the honey and olive oil mixture to the cooked oatmeal. Apply as a scrub, gently rubbing it in small circles over your skin, avoiding the eye area. Rinse off with warm water and pat dry. This mask can be done twice weekly. “The oatmeal in this scrub exfoliates, while the honey and olive oil moisturize,” says Argenti.
Cleanse: “Believe it or not, I love to cleanse with oil,” says Argenti. For this facial, she combines 1 Tbsp plain Greek yogurt with 2 tsp olive oil and 1/2 tsp lemon oil (not to be confused with lemon juice; lemon oil is an essential oil that can be found at health food stores). The mixture should be a little bit runny but not easily poured out. Massage it over skin, then immediately wipe it off with a washcloth soaked in tepid water. This can be done daily. “You want to use good-quality oil and you’ll be surprised at how clean your skin will feel,” says Argenti. “You don’t need a harsher product, even for skin with acne. Just be careful around the eye area…[the mixture] tends to be very sticky.”
For Oil- and Blemish-Prone Skin
Lift & Tighten: Combine 2 Tbsp plain yogurt with 1 Tbsp fresh lemon juice (the juice of one lemon) and apply to your cleansed face and neck. Let it dry for 20 to 30 minutes. You’ll feel the mask tighten on your face and neck, which creates a lifting and firming effect. Leave it on longer (up to one hour) for even more face-lifting effects. Once done, rinse with tepid water followed by a cool rinse. This mask can be done two to three times a week or whenever you need a face lift. “This instant face-lifting mask helps fade age-spots, acne scars and even helps keep blemishes and acne in check. It also gets rid of uneven-looking skin tone,” says Macan-Graves.
Tone: This toning eye treatment helps to “de-puff, relax, refresh and energize your skin,” says Argenti. “It’s much more cooling than the traditional cucumber slices.” After cleansing your skin, brew a cup of chamomile or green tea and allow it to cool. Then soak two clean, round makeup sponges in the tea and squeeze out any excess liquid. Place one on each of your eyes for 15 minutes. Do this daily. “You need to use an alcohol-free toner on your skin to cleanse and tighten pores. Alcohol is very detrimental, and tea works just as well,” adds Argenti.
For Dry Skin
Soothe: Combine 2 Tbsp honey with 1 Tbsp apple cider vinegar or lemon juice. Apply to your clean face and leave on for 20 minutes. Rinse with tepid water followed by a cool rinse. This can be done three times a week. “This mask heals, moisturizes and balances the pH of the skin,” says Macan-Graves. “Honey is a humectant and natural antibiotic that heals and moisturizes. Apple cider vinegar helps balance the pH of skin and soothes damaged skin.”
Moisturize: Macan-Graves recommends oatmeal and fennel to help moisturize dry skin. Grind 1 Tbsp oatmeal in a blender and set aside. Add 1 Tbsp fennel seeds to 1/2 cup boiling water to make a tea. Allow the seeds to steep for 10 minutes; strain the seeds and discard. Let it cool down to room temperature and then combine 1 Tbsp of the fennel tea with 1 Tbsp ground oatmeal and 1 Tbsp honey. Apply the mixture to your clean face and leave on for 20 minutes. Rinse with tepid water followed by a cool rinse. This mask can be done twice weekly.
Brighten: Combine 2 Tbsp sour cream with 2 Tbsp honey and 1 Tbsp apple cider vinegar or lemon juice. Apply to your cleansed face and leave on for 20 minutes. Rinse with tepid water followed by a cool (not cold) rinse. This mask can be done twice a week. “This mask heals, exfoliates, brightens and moisturizes skin. It refines pores, fades acne marks and prevents blemishes from coming up,” says Macan-Graves.
Let mek now if you try any of these out. I'd love to hear your reviews of them :D
As always, Thanks for reading beauties,
Danielle
Adapted from: Womans Day
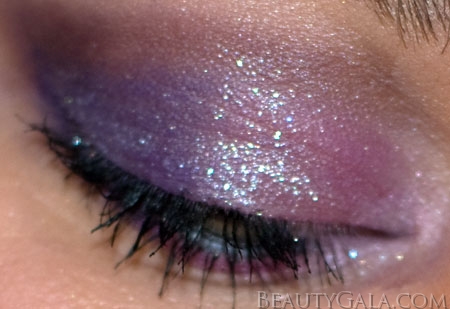
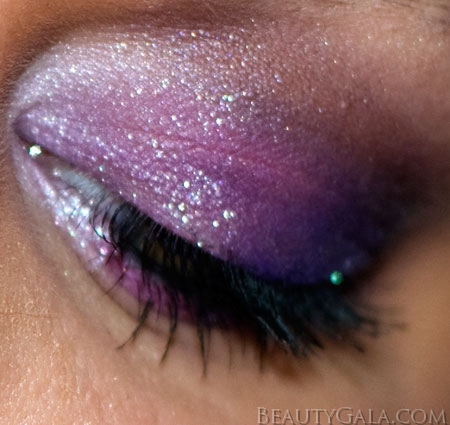
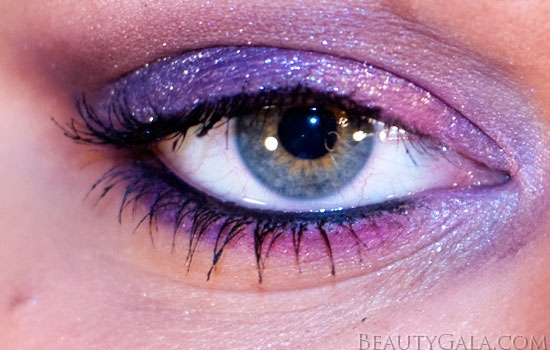
How To: Amethyst Ablazed
Hello Beauties,
I saw this look come up one day while I was looking for inspiration and thought that it was just to pretty not to share.
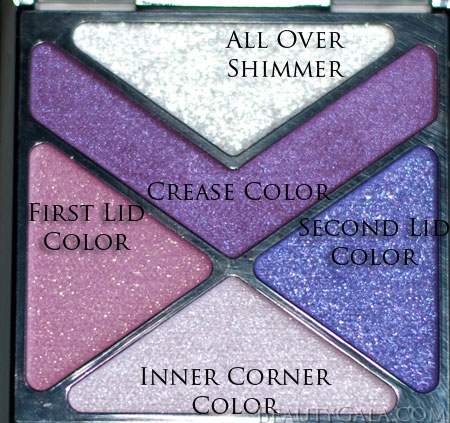
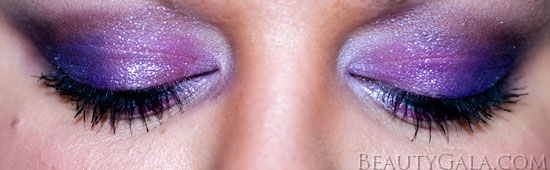
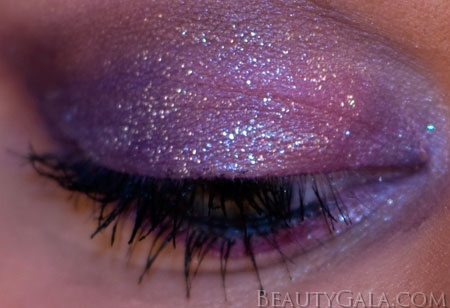
1. Apply a primer to your eyelids. This step is especially important when using vibrant, vivid shades like the ones in this palette.
2. Apply the pink-purple (first lid color) to the inner half of your eyelids, stopping at the crease. Use a good brush to pack down this color, and be sure to stop at the crease, or even slightly before. Also, stop this shade halfway across your eyelid, about where the middle of your pupil is if you were looking straight forward.
3. Apply the grape purple (second lid color) to the outer half of your eyelids, stopping at the crease. Again, pack this shade down well, and blend it with the pink-purple shade on the halfway point of your eyelid where they meet. Doing this will create a gradient, blended effect. You may need to go back and forth, reapplying the colors a couple of times to get a nice blended look.
4. Apply the deep plum (crease color) to your crease. Using a fluffy blending brush, I applied this shade to the crease of my eye only. I did not apply this to the outer corner of my eye, or take it very far towards my nose. I simply used this color to create a gradient and definition in the crease. Blend out well.
5. Apply the lavender (inner corner color) to the inner corners of your eyes, as well as your brow bone. This will open up your eyes and bring everything together.
6. Apply the silver shimmer over your entire eyelid, patting it down.This silver shimmer has a clear base, so it will only put down sparkle and shimmer to your purple lids. Gorgeous!
7. Apply the pink-purple and grape purple shades to your lower lash line. This step is optional, but I feel like it helps tie the look together, and bring out your eyes even more.
8. Line your lower waterline, and apply mascara. The finishing touches! If you’d like to line your upper lash line, or apply lashes, it will also make the look pop. I just don’t often wear upper lash liner or lashes, so I didn’t apply them in this case."
Thanks for reading beauties
Danielle
How To: Eye Shadow Placement
Hello Beauties,
I ran across this blog post and thought that it might be a good one to post for any beginners who may be reading.
"One of the most commonly asked questions by those who are just learning the makeup basics is, "where do I place the different eye shadows on my eyes?" " Where do the makeup eye shadows actually go on the eye?" "Which way is the correct way to put on eye shadows?"
Well,simply put...they all are!
There are many different styles and looks you can create by careful shadow placement. From simple color washes to eccentric multi-colored looks. Not all eye shapes are the exact same, but this is a general break down that will work for all eye types.
The eye is basically broken down into the following sections.
Lets start with your eyelid,
The movable part of your eye area that is usually seen with color when you blink.
The eyelid can be broken down into three separate sections.
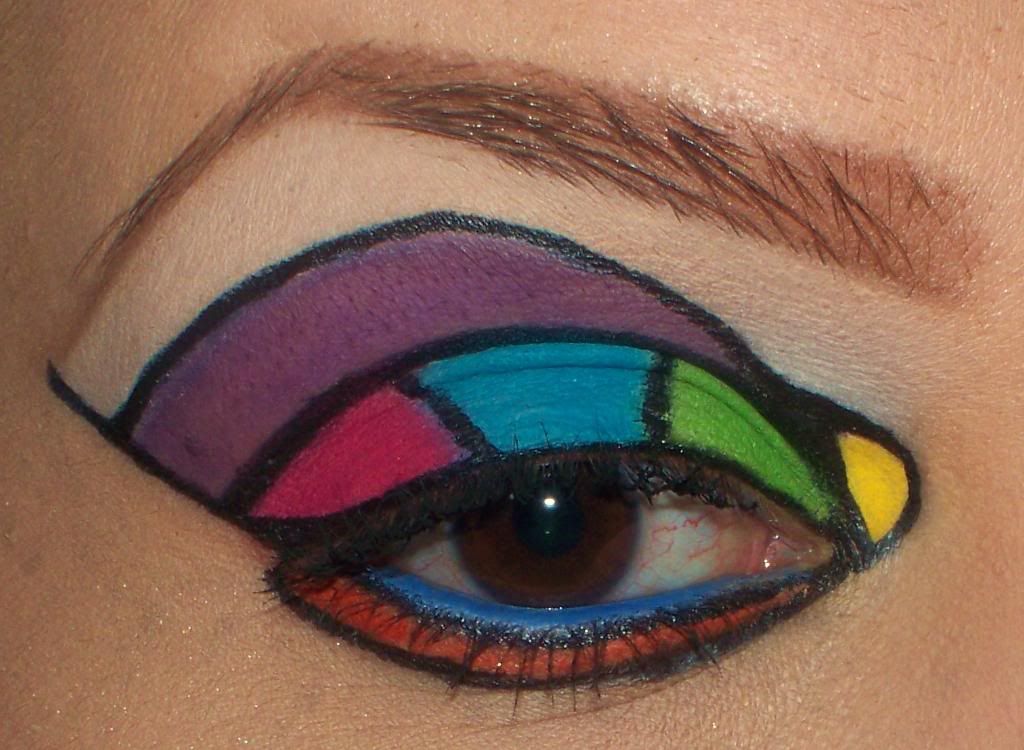
The Outer Lid #1- RED
is the part of your lid that covers from the edge of your eye in towards the edge of your iris. This is generally where you place the darkest shade.
The Middle of your eye lid #2- BABY BLUE
is your lid above your iris. This is where a medium toned shadow is generally placed.
The Inner part of your eyelid #3- LIME GREEN
is the inner part of your eyelid going towards the edge of your iris. This is where the lightest shadow on the eyelid is placed.
The Crease – is the area above your eye lid and below your brow bone area, along the eye socket/bone. This is where a dark color is blended into your eyeshadow below.
The Outer V- YELLOW
is the small area from your lower lash line up towards your brow, blending inwards towards the crease. The darkest of colors generally goes here.
Brow Bone - The brow bone sometimes has another colour or shade applied here and blended well into the crease, depending on the look.
The Highlight Area – CREAM/IVORY
The highlight area is found directly below your eyebrow. This is where a light wash of very light color is used to highlight the brow area.
The Lower lash line - DARK BLUE
is found directly below your eyelashes, under your eye. Depending on the look you are going for, a small line of color or black, gray or brown pencil may be used to circle the eye somewhat.
The Waterline- this is the part of your lower eye lid, that gets pressed together with your lashes when your eyes are closed. Not everyone is comfortable with wearing makeup there and some professionals advise against it, because of how close to your eyeball it is. This is where some ladies will place a line of pencil in a dark color or even white, to brighten the eye. Be careful when placing any sort of makeup so close to the inner eye and tear duct as you may harm your eye area. Not all makeup artists recommend lining the tear duct for health reasons.
Pick Your Style
Depending on the style of eye makeup you are after you can pick and choose which part of your eye are separated with color, and which aren’t. Not all eye looks are broken down so much.
Example, a simple wash of color over the entire eyelid is a common look, rather then breaking it into 3 sections. Find a look that works for you.There are no rules when it comes to makeup, this is only a guideline. A good rule of thumb is to stick with shades in one color range when starting out.
It is a lot easier to develop a nice look with shades very similar together, than using different colors.
i.e. Use 3 tones of blue, a dark, a medium and a light. Instead of trying to use blue, purple and pink.
Some More Makeup(Eye Shadow) Tips:
Always be sure to use clean brushes and applicators.
Make sure that any makeup item such as sparkles, shadows, pencils….are made for the eye area. Not all makeup products are safe to wear so close to the eye so be sure to read the labels. Eyeshadow powders are used all over the eye area. Pencil is used to line your lashes and cream shadows are used on your eyelid.
Lastly the key to fabulous looking eyes is blending! Blend, blend and blend some more. This is the part you don’t want to forget, it will bring all the shades together nicely and give a beautiful finish to your look.
Keep in mind these are simply guidelines and there are many different looks you can come up with, these are just areas you will hear commonly referred to or talked about in tutorials.
Makeup is all about self expression, so experiment, be creative, and most importantly have fun.
Thanks for reading beauties
Danielle
I ran across this blog post and thought that it might be a good one to post for any beginners who may be reading.
"One of the most commonly asked questions by those who are just learning the makeup basics is, "where do I place the different eye shadows on my eyes?" " Where do the makeup eye shadows actually go on the eye?" "Which way is the correct way to put on eye shadows?"
Well,simply put...they all are!
There are many different styles and looks you can create by careful shadow placement. From simple color washes to eccentric multi-colored looks. Not all eye shapes are the exact same, but this is a general break down that will work for all eye types.
The eye is basically broken down into the following sections.
Lets start with your eyelid,
The movable part of your eye area that is usually seen with color when you blink.
The eyelid can be broken down into three separate sections.
The Outer Lid #1- RED
is the part of your lid that covers from the edge of your eye in towards the edge of your iris. This is generally where you place the darkest shade.
The Middle of your eye lid #2- BABY BLUE
is your lid above your iris. This is where a medium toned shadow is generally placed.
The Inner part of your eyelid #3- LIME GREEN
is the inner part of your eyelid going towards the edge of your iris. This is where the lightest shadow on the eyelid is placed.
The Crease – is the area above your eye lid and below your brow bone area, along the eye socket/bone. This is where a dark color is blended into your eyeshadow below.
The Outer V- YELLOW
is the small area from your lower lash line up towards your brow, blending inwards towards the crease. The darkest of colors generally goes here.
Brow Bone - The brow bone sometimes has another colour or shade applied here and blended well into the crease, depending on the look.
The Highlight Area – CREAM/IVORY
The highlight area is found directly below your eyebrow. This is where a light wash of very light color is used to highlight the brow area.
The Lower lash line - DARK BLUE
is found directly below your eyelashes, under your eye. Depending on the look you are going for, a small line of color or black, gray or brown pencil may be used to circle the eye somewhat.
The Waterline- this is the part of your lower eye lid, that gets pressed together with your lashes when your eyes are closed. Not everyone is comfortable with wearing makeup there and some professionals advise against it, because of how close to your eyeball it is. This is where some ladies will place a line of pencil in a dark color or even white, to brighten the eye. Be careful when placing any sort of makeup so close to the inner eye and tear duct as you may harm your eye area. Not all makeup artists recommend lining the tear duct for health reasons.
Pick Your Style
Depending on the style of eye makeup you are after you can pick and choose which part of your eye are separated with color, and which aren’t. Not all eye looks are broken down so much.
Example, a simple wash of color over the entire eyelid is a common look, rather then breaking it into 3 sections. Find a look that works for you.There are no rules when it comes to makeup, this is only a guideline. A good rule of thumb is to stick with shades in one color range when starting out.
It is a lot easier to develop a nice look with shades very similar together, than using different colors.
i.e. Use 3 tones of blue, a dark, a medium and a light. Instead of trying to use blue, purple and pink.
Some More Makeup(Eye Shadow) Tips:
Always be sure to use clean brushes and applicators.
Make sure that any makeup item such as sparkles, shadows, pencils….are made for the eye area. Not all makeup products are safe to wear so close to the eye so be sure to read the labels. Eyeshadow powders are used all over the eye area. Pencil is used to line your lashes and cream shadows are used on your eyelid.
Lastly the key to fabulous looking eyes is blending! Blend, blend and blend some more. This is the part you don’t want to forget, it will bring all the shades together nicely and give a beautiful finish to your look.
Keep in mind these are simply guidelines and there are many different looks you can come up with, these are just areas you will hear commonly referred to or talked about in tutorials.
Makeup is all about self expression, so experiment, be creative, and most importantly have fun.
Thanks for reading beauties
Danielle
Zit Zapper
Hello Beauties,
We've all had them, those monster zits that just won't seem to go away no matter what you try, the regular skin routine, and the pimple creams have NO EFFECT.
We've all had them, those monster zits that just won't seem to go away no matter what you try, the regular skin routine, and the pimple creams have NO EFFECT.
Next time this happens to you, try adding this to the regular regiment:
Step 1
Use a Q Tip to dab a cortisone cream over the affected area (try using Aveeno 1% Hydrocortisone cream) to calm inflammation

Step 2
Let the cortisone cream absorb for 5 minutes
Step 3
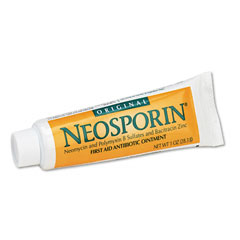
Once the cortisone has been absorbed, spread a thin layer of neosporin over the affected area to help kill bacteria
If you follow these steps every night and you will see results in no time.
Thanks for reading beauties
Danielle
Thanks for reading beauties
Danielle
Subscribe to:
Posts (Atom)