Friday, 31 July 2015

Review: July Ipsy Bag

Hello Beauties,

It seems like it has been a while since I last posted and I am sorry about the delay. I took a little vacay with my fam jam in July so there was no internet for a good portion of the month.


A little while ago I decided to be to a monthly beauty box of some kind so that I could stay up to date with the newest products, and test them out for some honest reviews.
Then I kept forgetting to subscribe to one...womp womp.

This month I FINALLY signed up for the Ipsy bag, which is the monthly subscription bag started by the beauty guru Michelle Phan. Basically, you take a quiz and then receive 4 - 5 personalized deluxe sized samples in a cute cosmetic bag once a month.

This was my first month using the subscription service and I have to say I was not disappointed.

This month I recieved :

Jorel Parker Classico eau du parfum roller ball ( I will say that I do wish that it was a spritzer rather than a roller ball, but I suppose beggers can't be choosers, right?)

"Exotic, inspiring, and full of surprises, Classico whisks you away from the day-to-day. Indulge in the spicy seduction of Indian Tuberose, the striking and sweet sensation of Turkish Cyclamen and the purifying calm of Spanish Mandarin"
It took me more than one time wearing this fragrance to decide how I felt about it, but I really like it. It is well balanced and neither to floral, nor too spicey. It fades well too, I especially love the bass notes in it.


Mongongo Lip Balm Conditioner in Vanilla Coconut


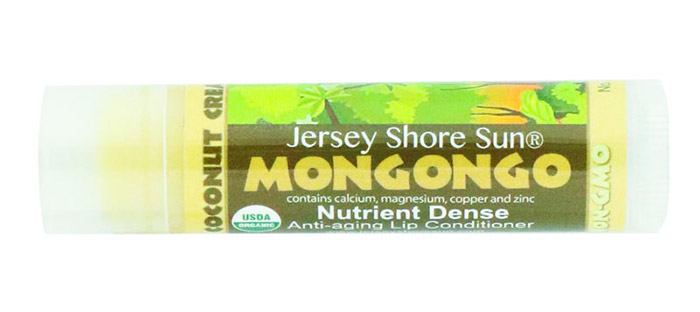
I honestly love this stuff. I would definitely buy it if given the chance. It hydrated my lips and kept them soft and smooth without having to continually reapply. Essentially exactly what you want out of a lip conditioner


Tarte Amazonian Clay Waterproof Bronzer - Park Avenue Princess


I have to be honest here, I was NOT happy to see that I was getting this in my bag. As a red head, I am very fair, so I don't EVER wear bronzer. When I first saw this in there, I was thinking, great a product that I will never, ever use, I even tried to go online and see if I could switch it for another one of the products they were offering. As it turns out, you can not switch just one or two of the products, so i waited for the bronzer to arrive figuring at the worst I could give it to a friend.
When I opened my bag for the first time, I decided that I would use all the products just once to create a summer look, and that way I would get the chance to test them all out and see what I liked.
The bronzer is gorgeous against my skin, gives me the perfect sun kissed glow and would double as a great eye shadow. I am totally sold on the idea of a bronzer now.


Eyetini Swizzle Stick - Blue Hawaiian


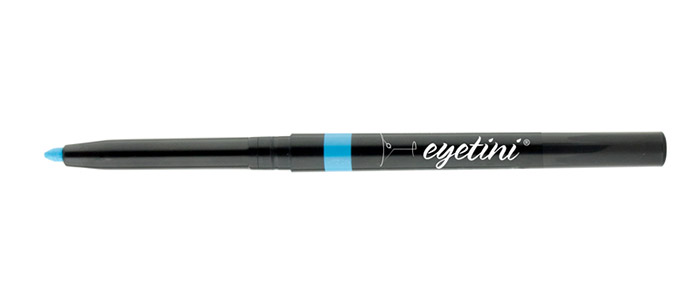
This liner I felt I could take or leave. It is a great consistency, and the colour payout is fantastic, but I really wish that I had gotten a more neutral colour instead of the bright blue.
I think it is a beautiful shade, but not one that I think I would personally wear often.

Fianlly I also recieved a Belle Pierre Lipstick in shade P.I.N.K


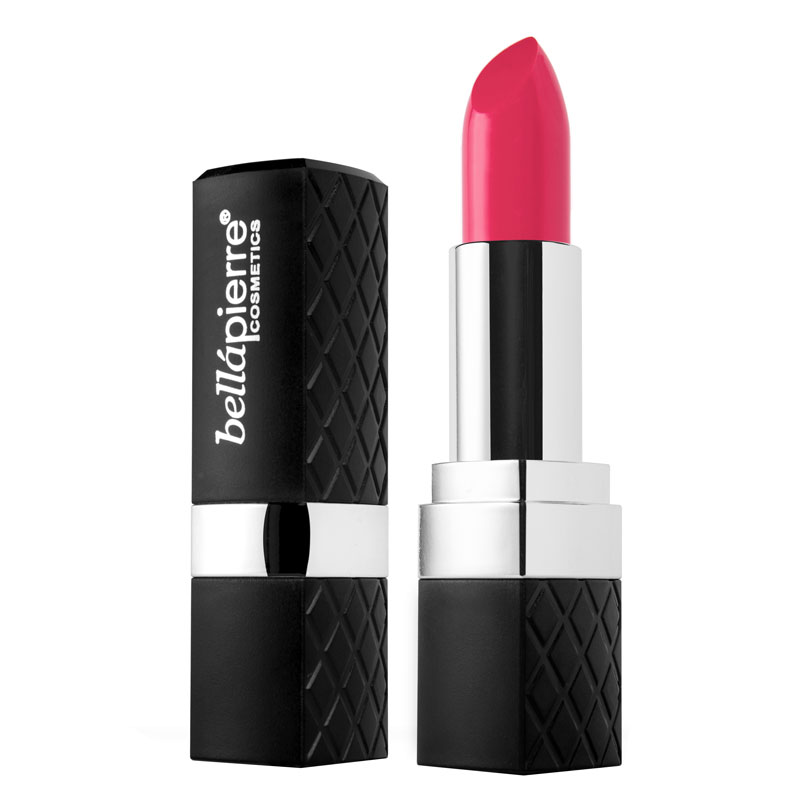
The lipstick goes on creamy and smooth and the colour payout is great. I love this one on it's own, or mixed with a lighter shade to create a more natural pink tone. It's just a really pretty bright pink.


All of the products arrived in this cosmetic bag. It is super bright and summery and just a lot of fun over all

So far my experience with Ipsy has been great, the bag arrived right on time, and I really like the products that were selected for me this month. I have kept my subscription for the month of August and I can not wait to see what I get this time around.

I'll be sure to share another one of these with you in the next few weeks

stay beautiful and thanks for reading


Danielle

Friday, 3 July 2015

Dragon Lady: Body Image and the Beauty Industry

Hello Beauties,


So today I wanted to touch on a topic of body shaming and the stereotypes that still linger within the beauty industry. This post is near and dear to my heart because I am a plus size girl, my dress size on average is about a 12 / 14 and people can be very cruel when you're working in a industry where you're "supposed to be looked at"


I'm going to talk about a personal experience that I had while working for Estee Lauder.

Basically, we were getting ready to have our Christmas gala. The gala is an event where all of the makeup counters invite their regular clients to come in and stock up on their product, the counters will usually offer a special gift with purchase, as well as coupons, snacks, entertainment, etc. The attire for employees working the gala is supposed to be semi- formal, so a few days before gala night I went and bought a really adorable David Dixon little black dress.

The dress was strapless with a fitted bodice and an A line pleated skirt.

I loved the way the dress fit, it was super cute and gave me the perfect hour glass figure. I thought I looked pretty good, and felt super confident in my LBD, like if every girl should have one, this was totally mine.


I arrived for my shift on the day of the gala wearing my LBD and feeling pretty excited with myself, naturally the counters were swamped, so I was SUPER busy for almost the entire shift.

As I was getting ready to leave for the evening, a woman approached the counter looking for help. I was supposed to be leaving but thought I would stay to give the woman a hand (after I had already punched out).

As it turns out, the lady had a tonne of questions and was looking for an ENTIRE skin care routine, on a budget none the less. I walked her through the products we offered, how to use them, which ones would work best for her and even which ones she could come back for so she didn't break her budget.

Finally she was satisfied, She had her skin care regime, knew how it all worked and how to apply it to herself, so we proceeded to the cash so we could both leave the store.

I was ringing her up, and I could feel her eyes on me when she says, "You've got a really pretty face"

I was about to thank her, when she continued with "you know if you lost a few pounds you'd be beating them off with a stick"

At first I thought that I had heard her wrong, there was no way that this woman just said that to me...

Then it dawned on me, that she definitely said it, and whats worse, she clearly didn't see anything wrong with saying it.

I had no idea how to respond to her, so I just sort of smiled and laughed it off, but she wasn't done yet.

She then told me that she was surprised that the makeup counters would hire me because "You're representing the brand" and "People would be looking at you all day" but "good for me for getting the job"

By this point, I am totally mortified and have no idea how to handle the situation. I've never been so passive aggressively called fat in my entire life, and how rude is this woman.

Then I get angry.
I'm angry at the woman for being so insensitive, but I am also mad at myself.

I realized that I just gave this woman, this complete stranger, total control over me. By allowing her to take away my confidence, I had allowed her to make me feel not only fat, but untalented as well. Like I didn't deserve my job, because I weighed a few extra pounds.

She just got to flounce out of the store with her new purchases, while I stewed the entire way home over how I looked (I swore I would never wear the LBD again), my abilities as a makeup artist and if I could ever make it in the beauty industry.

Whether we like it or not the stereotype seems to exist that if you don't look like a model yourself, then you don't deserve to work in the beauty industry in any capacity - and it's just not right and yet there it is.

I guess the moral of the story is - don't let anyone take away your power, know that you matter and that your talents aren't diminished for all someone can't see beyond the package they're contained within
.
It doesn't matter if you're tall, short, fat, thin, gay, straight, man or woman - Own your body, and don't let anyone take away your confidence ;)


Danielle

PS - I wore my LBD again - to a modeling agency none the less ;D

Thursday, 2 July 2015

Tips: The Scrub That Will Ruin Your Skin

Hello Beauties,

I realized it's been a while since I've done an honest to goodness skin care post, so, here it is.

Your skin is your body's largest organ. It is a complex system of layered cells that protects the rest of your body from the harsh pollutants of the outside world. The dermal layers of the skin in order from the surface down are :
- The epidermis
- The dermis
- The Hypodermis


Skin care lotions and creams generally only penetrate the skin to its epidermal layers, though some medicinal creams and lotions can penetrate into the dermis and hypodermis.

The epidermis contains:
- The Stratum Corneum
- The Stratum Lucidum
- The Stratum Granulosum
- The Stratum Spinosum
- The Stratum Basale


If skin cells are the bricks of the skin, then collagen is the mortar. It helps to hold the skin together and gives your skin it's elasticity as well as its strength, and is responsible for replacing dead skin cells. Your collagen is essentially the main support structure for your skin. As we age your body produces less collagen, which makes the skin loose its elasticity.
It's this slow down in the production of collagen that causes fine lines and wrinkles to occur.


Let's get into exfoliating.
You should be exfoliating your skin once a week. This will help remove the layer of dead skin cells (stratum corneum), so that your body can replace them with healthy new cells.
Over exfoliating, and exfoliating with products that are too harsh can result in skin conditions (IE Oily skin), and the long term breakdown of your skin's function.


which brings us to...

St. Ives -

I'm sure most of you have at least heard about, if not used the St. Ives apricot scrub...and here is why you should never use it on your face again.

They claim to use "crushed" apricot pits in their scrub as an exfoliant. the problem with that is when you crush anything, especially something as rigid as a peach/ apricot pit, you're going to get sharp and jagged pieces in the product. These jagged pieces will force off healthy skin cells, as well as the dead ones as it moves across the dermis. Over time this will result in the break down of the collagen that holds the cells together, which will cause premature aging, fine lines and wrinkles.


If you're looking for a good scrub that will be gentle on your skin, but still effective, try any type of scrub with round exfoliating beads. These beads are generally man made from plastic materials.
If you're looking for something a little more natural - look for something that contains jojoba beads. These beads are made from the jojoba wax and are all natural.

If you're looking for something that is gentle enough to use on your skin every day, you could try Dermalogica daily microfoliant.


This is my personal favourite, you can use it as often or as few times a week as you like.

Exfoliating is the way to beautiful, glowing skin. Just make sure you're using the right product for your skin.


Danielle

Tuesday, 30 June 2015

A Month of Mascaras

Hello Beauties,

I love mascara and I have so many of them that if I did individual reviews of each one, I would be doing mascara reviews for the next year, so I decided to do a month long review and say a little bit about each one of these amazing (or not so much) mascaras.
I've done a mix of  both department and drug store brands, so I've tried to group them together by similar price points. You'll notice with the drugstore brands that there is no packaging information, that is because for all of the mascaras I decided to review, they didn't really come in a package per-say. They were more or less shrink wrapped to some cardboard and that is about it.
The mascaras in this post range from $7 to $ 35, I have included pricing for each in their individual reviews.

So let's begin

1. Hypnose Drama - Lancome 
The Lancome mascara's pretty much all go for the same price, they start around $35 (CAD) and go up to as much as $70 depending on the type that you choose. I was able to buy the Hypnose Drama in a combo package on sale for $25.00 (CAD). The packaging is very simple and sleek, the outer box is the Lancome silver with the rose on it, the actual tube of mascara is flat black with gold writing and the lancome rose. 
Once you open it, you see that the mascara wand spirals, curves slightly, and is smaller in size. I found that the smaller wand gets into the entire eye really well and grabs all your lashes for really even, full coverage. I found that my lashes looked longer as well as fuller without being clumpy or unnatural looking. 

2. They're Real - Benefit 


I had heard a lot of really good things about this mascara and I have to say that I was not in love (but I really wanted to be!) I love the name of the mascara, the name had to be one of the main reasons I bought it. I picked mine up at Shoppers Drug Mart for $35, but you can also pick it up at Sephora for $29.  It comes in a vintage style black box that is sort of reminiscent of old Hollywood. The mascara tube is a little shorter than other brands I have seen, it is that same gun metal colour and sleek. The wand is slender and really gets into those hard to reach areas of the eye. HOWEVER, I don't like buying waterproof mascara for day to day use because:

- It's bad for your lashes. The extra waxes in waterproof mascara are more likely to dry out your lashes causing breakage and slower lash growth. 

- It's so much more difficult to get off at the end of the day. You should be washing off your makeup before bed each day, if you're using waterproof mascara you're creating a lot of extra work for yourself. Not to mention. All the extra scrubbing and rubbing at your eyes and the sensitive skin around them...ouch! 

That being said, no where on the packaging did it say that it was a waterproof mascara, but it certainly acted like one. The waxy texture on my lashes, while adding a tonne of length and volume, felt awful and made it very difficult to wash off at the end of the day. It didn't seem to matter how hard I scrubbed, I woke up with serious raccoon eyes in the morning. That being said, I did throw it in my kit for bridal clients because nobody wants mascara running down their face when they say "I do"

3. High Impact Extreme Volume Mascara - Clinique 
I LOVE this mascara, it is my go to for a night out bar none. It is one of the cheaper "deapartment store brands" that I picked up, I believe it retails for around $18 (CAD). The mascara comes in a pastel floral pattern box, the tube itself is silver and sleek with the name of the mascara printed in white lettering. The mascara wand is kind of short, and mid sized, it can be a little more challenging getting the brush into those smaller hard to reach lashes but over all the effect of the mascara is AMAZING. The mascara is a very rich black and  adds a tonne of volume without clumping. You do need to be careful if applying more than one coat, that the first coat is completely dry before you add the next, just to be sure you definitely don't get any clumps. This mascara will give you a all the drama you want without having to add falsies. Like I said earlier, this is my go to mascara, I really just can not say enough good about it. 

4. Sumptuous Extreme - Estee Lauder 
Oh Estee, why you gotta do this to me!  
If this mascara was a boyfriend - it would be the one you fell for to fast, and then had a messy breakup from a few weeks later.  I make no secret of the fact that I worked for Estee Lauder, for the most part, I love a great many of their products, and found that when compared to others they really stand up on their own. That being said, this was one product that I just could not keep using. It made my lashes look amazing, but when worn for a full day I found that my eyes would burn and sting something awful. I picked this mascara up at an Estee Lauder training I went to, but you can pick them up at most department stores for $28

5. Last Blash Fusion - CoverGirl
I picked this mascara up at Walmart for about $7 when I had gone away on a trip, because I had forgotten to pack my go to Clinique mascara. I have to say I was really impressed with it, it gave really good definition, and volume without clumping. This is a really great option to throw into your makeup bag for either traveling or day to day use. 


6. Telescopic Lengths Mascara - L'Oreal 
This mascara I picked up at Shoppers Drug Mart on sale for about $10, and this is one I bought more or less because the packaging was super cute. The box its self was nothing special, but the tube of product is actually shaped like a little telescope.. IKR - TOO  CUTE!
I found with this mascara I liked it, but I wasn't in love with it. I have fairly long lashes naturally, but being a red head, they are very fair and kind of sparse so I tend to choose volumizing formulas. With this mascara there was no volume what so ever, it sort of just defined my lashes, but didn't really do anything else for them.  I started to use it as a base coat to layer other mascaras over top, but generally I don't wear this one on it's own. 


7. Voluminous Buterfly - L'Oreal 
This mascara was a whim purchase because I was curious about the butterfly effect" it was supposed to have on your lashes. I can honestly say that I think I used this mascara a handful of times, while it's not a bad mascara, I kind of forgot about it. It didn't really leave an impression good, or bad. 


8. Voluminous Million Lashes Excess & Volume Million Lashes So Couture, So Black - L'Oreal

Apparently I have a thing for L'Oreal mascara's. 
These two mascaras are pretty much the same, I bought them as part of a charity event at my local shoppers Drug Mart for $5. I think they're both decent mascaras, but neither one of them really blew me away. The brush on the million lashes couture is slightly smaller, so it is easier to get into the smaller areas of the eye and to do the bottom lashes.  


The biggest thing to remember about any type of makeup is that it really all comes down to personal preference, always remember that as long as you like it, there are no rules. 


Thanks for reading


Danielle


Thursday, 25 June 2015

Trends: Red Concealer ?

Hello Beauties

Lately I've been seeing these posts ALL OVER the internet about this "Red Lipstick Concealer" trend.

If you haven't seen anything about this yet, basically people are using red lipstick to camouflage dark circles in the under eye area and yes it really does work.

essentially the red pigment in the lipstick acts as a corrector and covers the blue and purple tones that are so often found in dark under eye circles.

The red lipsticks works best on people with a darker complexion, on fairer people, something with an orange or coral tone works better.

TI am a red head, so typically if I am trying to cover my dark circles I will use the BH Cosmetics Concealer Palette. There is an orange corrector that comes in the palette which works wonderfully (and saves me from having to bust out my lipsticks)


I will also sometimes use these concealer/corrector wheels from Lise Watier


For the best results what you want to do is:

1. Moisturize!

Always start by prepping your skin for the makeup you're going to be using, moisturizing will help smooth and hydrate the skin. It will also help keep cosmetics out of pores which will help with breakouts. If you like using primers, you should apply one about 5 minutes after you've used your moisturizer, just so that it has enough time to full absorb into the skin.


2. Apply your Lipstick

Now you're going to want to apply your lipstick/ corrector to the dark areas you wish to conceal. There are two things that will effect the choice of colour for your corrector. 1.the undertone of you skin - when you look at your wrist, if the veins you see there are blue in colour, you have a cool undertone. Likewise, if you look at the veins and they are green, you have a warm undertone. Secondly, the tone of the actual dark circles. What you want to try and do is pick a shade of lipstick that will neutralize the undertones in the dark circles. You do this by selecting colours that are opposites on the colour wheel


Blue toned dark circles tend to appear on people with cool undertone skin (orange corrector)
Green-blue toned dark circles tend to appear on people with warmer undertone skin (red concealer)
Apply your corrector of choice, and blend into the eye area with either a brush or sponge.

3. Set your Corrector
You're going to want to set the corrector you just used over the dark circles so that it doesn't mix into your concealer or foundation whe nyou apply those to the undereye area.
Use a fluffy brush to apply your setting powder of choice into your under eye area. Use a clean powder brush to dust away any excess powder that might be left behind.

4. Apply your Concealer/ Foundation
Lastly you're going to apply your concealer and or foundation as you normally would.


Voila! what under eye circles !?

Thanks for reading - I love to read what you think, leave me lots of comments ;D


Danielle


Saturday, 20 June 2015

How To: Contour and Highlight - Cream Edition

Hello Beauties,

Highlight and contour are so important for any makeup look, it helps to define and sharpen your bone structure, or can be used to create an entirely new face shape all together.

Contour can be used to change the shape of your nose, slim your face, define your cheek bones and even reduce a double chin. It is MAGIC!

While contour is meant to diminish/ hide, highlight is meant to brighten/ make more prominent. The more light that is forced into an area the more noticeable it will become.

I know that I've written a post in the past about highlighting and contouring; but th at was before the so called "Kim K" method using creams became so popular.

So, let's begin! How to do it in just 7 easy steps

You'll need:

- Moisturizer (I'm using Olay complete for normal skin)

- Foundation/ BB cream (I'm using rimmel stay matte in 100 fair ivory)

- Setting powder (I'm using MUFE HD powder)

- Cream concealer in 2 shade - one lighter than your skin tone and one darker (I'm currently using Cover FX in the lightest shade in the line and Tom Ford traceless foundation stick in 08 Caramel)

- RE-usable cosmetic sponge ( I use the faux beauty blender by QUO)

- Large powder brush (I'm using one by Pari)

- Highlight powder (I'm realyl fair, so I am using MAC mineralized skin finish in lightscapade)

- Blush or fan brush

- Contour powder (I use MAC blot powder in dark OR MAC always sunny pro long wear shadow)

- Contour brush ( again - Pari)


Step 1 - Prep your skin
Moisturize your face and allow the moisturizer to full absorb before you apply anything else. If you're going to use a primer, now is the time to apply it.

Step 2 - Apply your foundation

apply your foundation to your entire face as you normally would. Make sure you blend well.

Step 3 - Set your foundation
Apply your setting powder to your entire face. Once you've applied your powder, take a large CLEAN powder brush and sweep gently over your face again, taking away any excess that might be lingering

Step 4 - Contour
Find the hollows in your face/ places where shadows naturally occur - (Usually below the cheek boens - near the temples - forehead, near the hairline - sides of the nose - and below the jaw bone)- Apply your darker concealer in those areas and buff it out using your cosmetic sponge. You don't want to completely remove the colour, but you don't want any harsh lines.

Step 5 - Highlight
Look for areas on your face that light would naturally fall -(Usually the forehead, bridge of the nose, under the eyes, and cheekbones) - Apply your lighter concealer and then blend out with your cosmetic sponge. Again you don't want to completely take the colour away, but you don't want any harsh blocks of colour either

Step 6 - Contour...again
Now it's time to go back in with your contour powder and make sure that your contour is set and well blended. Remember that contour powders should be Matte to give you the best effect. While you can use a bronzer - you're better off using a matte powder or eye shadow to create depth in your contour.

Step 7 - Highlight....well you get the drill
Go back in with your highlight powder of choice and make sure that your highlight areas are set and well blended.


Flawless looking skin every time ;D


Thanks for reading lovelies, leave me comments and let me know if this helped you


Danielle


Wednesday, 17 June 2015

Makeup on the Move

Hello Beauties, 
It is said that a woman only needs 3 things with her to get "flirty on the fly", next time you head out, don't forget to throw this dynamic trio into your purse.


Bronzer - Will help give your skin a gorgeous summer glow, this hue also makes ALL EYE COLOURS POP!!! Simply sweep some over your eyelid with your finger. 
My Pick - Estee Lauder Bronze Goddess

Hand Cream - Apply your hand cream of choice over your hands and then run them through your hair. This will help smooth frizz and add shine.  Likewise you can rub it over your arms and legs to give your skin a sexy, glowy sheen.
My Pick - Bath and Body Works - Thousand Wishes (smells AMAZING, which seems like a great substitute to carrying perfume around)


Lipstick - swipe a peachy coral shade onto your lips and your cheeks.  Dab onto the apples of your cheeks and blend out with your fingers. 

My Pickestee lauder pure colour crystal lipstick melon or Lancome Rogue in Love in Jolis Matins


Hope this helps you for the summer weather a head. 

Thanks for reading beauties, 

Danielle