Tuesday, 30 June 2015

A Month of Mascaras

Hello Beauties,

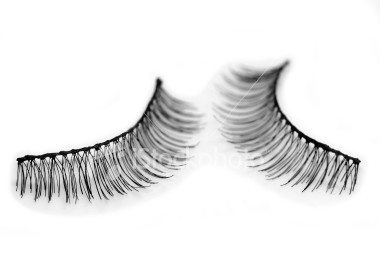
I love mascara and I have so many of them that if I did individual reviews of each one, I would be doing mascara reviews for the next year, so I decided to do a month long review and say a little bit about each one of these amazing (or not so much) mascaras.
I've done a mix of  both department and drug store brands, so I've tried to group them together by similar price points. You'll notice with the drugstore brands that there is no packaging information, that is because for all of the mascaras I decided to review, they didn't really come in a package per-say. They were more or less shrink wrapped to some cardboard and that is about it.
The mascaras in this post range from $7 to $ 35, I have included pricing for each in their individual reviews.

So let's begin

1. Hypnose Drama - Lancome 
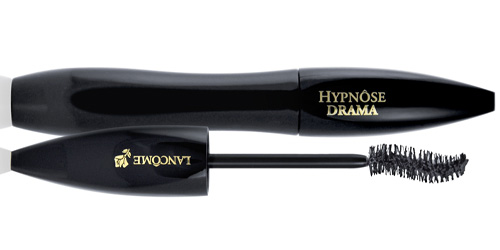
The Lancome mascara's pretty much all go for the same price, they start around $35 (CAD) and go up to as much as $70 depending on the type that you choose. I was able to buy the Hypnose Drama in a combo package on sale for $25.00 (CAD). The packaging is very simple and sleek, the outer box is the Lancome silver with the rose on it, the actual tube of mascara is flat black with gold writing and the lancome rose. 
Once you open it, you see that the mascara wand spirals, curves slightly, and is smaller in size. I found that the smaller wand gets into the entire eye really well and grabs all your lashes for really even, full coverage. I found that my lashes looked longer as well as fuller without being clumpy or unnatural looking. 

2. They're Real - Benefit 


I had heard a lot of really good things about this mascara and I have to say that I was not in love (but I really wanted to be!) I love the name of the mascara, the name had to be one of the main reasons I bought it. I picked mine up at Shoppers Drug Mart for $35, but you can also pick it up at Sephora for $29.  It comes in a vintage style black box that is sort of reminiscent of old Hollywood. The mascara tube is a little shorter than other brands I have seen, it is that same gun metal colour and sleek. The wand is slender and really gets into those hard to reach areas of the eye. HOWEVER, I don't like buying waterproof mascara for day to day use because:

- It's bad for your lashes. The extra waxes in waterproof mascara are more likely to dry out your lashes causing breakage and slower lash growth. 

- It's so much more difficult to get off at the end of the day. You should be washing off your makeup before bed each day, if you're using waterproof mascara you're creating a lot of extra work for yourself. Not to mention. All the extra scrubbing and rubbing at your eyes and the sensitive skin around them...ouch! 

That being said, no where on the packaging did it say that it was a waterproof mascara, but it certainly acted like one. The waxy texture on my lashes, while adding a tonne of length and volume, felt awful and made it very difficult to wash off at the end of the day. It didn't seem to matter how hard I scrubbed, I woke up with serious raccoon eyes in the morning. That being said, I did throw it in my kit for bridal clients because nobody wants mascara running down their face when they say "I do"

3. High Impact Extreme Volume Mascara - Clinique 
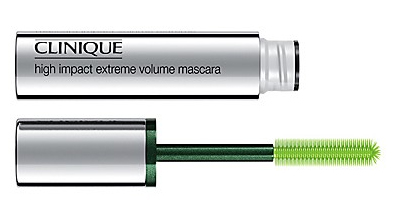
I LOVE this mascara, it is my go to for a night out bar none. It is one of the cheaper "deapartment store brands" that I picked up, I believe it retails for around $18 (CAD). The mascara comes in a pastel floral pattern box, the tube itself is silver and sleek with the name of the mascara printed in white lettering. The mascara wand is kind of short, and mid sized, it can be a little more challenging getting the brush into those smaller hard to reach lashes but over all the effect of the mascara is AMAZING. The mascara is a very rich black and  adds a tonne of volume without clumping. You do need to be careful if applying more than one coat, that the first coat is completely dry before you add the next, just to be sure you definitely don't get any clumps. This mascara will give you a all the drama you want without having to add falsies. Like I said earlier, this is my go to mascara, I really just can not say enough good about it. 

4. Sumptuous Extreme - Estee Lauder 
Oh Estee, why you gotta do this to me!  
If this mascara was a boyfriend - it would be the one you fell for to fast, and then had a messy breakup from a few weeks later.  I make no secret of the fact that I worked for Estee Lauder, for the most part, I love a great many of their products, and found that when compared to others they really stand up on their own. That being said, this was one product that I just could not keep using. It made my lashes look amazing, but when worn for a full day I found that my eyes would burn and sting something awful. I picked this mascara up at an Estee Lauder training I went to, but you can pick them up at most department stores for $28

5. Last Blash Fusion - CoverGirl
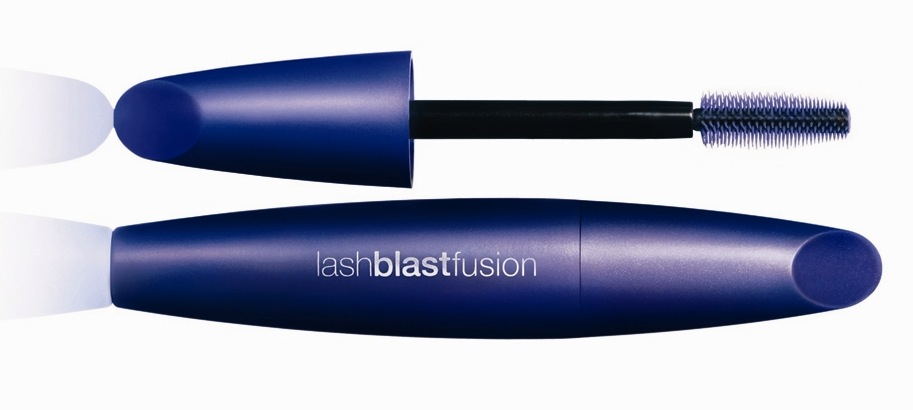
I picked this mascara up at Walmart for about $7 when I had gone away on a trip, because I had forgotten to pack my go to Clinique mascara. I have to say I was really impressed with it, it gave really good definition, and volume without clumping. This is a really great option to throw into your makeup bag for either traveling or day to day use. 


6. Telescopic Lengths Mascara - L'Oreal 
This mascara I picked up at Shoppers Drug Mart on sale for about $10, and this is one I bought more or less because the packaging was super cute. The box its self was nothing special, but the tube of product is actually shaped like a little telescope.. IKR - TOO  CUTE!
I found with this mascara I liked it, but I wasn't in love with it. I have fairly long lashes naturally, but being a red head, they are very fair and kind of sparse so I tend to choose volumizing formulas. With this mascara there was no volume what so ever, it sort of just defined my lashes, but didn't really do anything else for them.  I started to use it as a base coat to layer other mascaras over top, but generally I don't wear this one on it's own. 


7. Voluminous Buterfly - L'Oreal 
This mascara was a whim purchase because I was curious about the butterfly effect" it was supposed to have on your lashes. I can honestly say that I think I used this mascara a handful of times, while it's not a bad mascara, I kind of forgot about it. It didn't really leave an impression good, or bad. 


8. Voluminous Million Lashes Excess & Volume Million Lashes So Couture, So Black - L'Oreal

Apparently I have a thing for L'Oreal mascara's. 
These two mascaras are pretty much the same, I bought them as part of a charity event at my local shoppers Drug Mart for $5. I think they're both decent mascaras, but neither one of them really blew me away. The brush on the million lashes couture is slightly smaller, so it is easier to get into the smaller areas of the eye and to do the bottom lashes.  


The biggest thing to remember about any type of makeup is that it really all comes down to personal preference, always remember that as long as you like it, there are no rules. 


Thanks for reading


Danielle


Thursday, 25 June 2015

Trends: Red Concealer ?

Hello Beauties

Lately I've been seeing these posts ALL OVER the internet about this "Red Lipstick Concealer" trend.

If you haven't seen anything about this yet, basically people are using red lipstick to camouflage dark circles in the under eye area and yes it really does work.

essentially the red pigment in the lipstick acts as a corrector and covers the blue and purple tones that are so often found in dark under eye circles.

The red lipsticks works best on people with a darker complexion, on fairer people, something with an orange or coral tone works better.

TI am a red head, so typically if I am trying to cover my dark circles I will use the BH Cosmetics Concealer Palette. There is an orange corrector that comes in the palette which works wonderfully (and saves me from having to bust out my lipsticks)


I will also sometimes use these concealer/corrector wheels from Lise Watier


For the best results what you want to do is:

1. Moisturize!

Always start by prepping your skin for the makeup you're going to be using, moisturizing will help smooth and hydrate the skin. It will also help keep cosmetics out of pores which will help with breakouts. If you like using primers, you should apply one about 5 minutes after you've used your moisturizer, just so that it has enough time to full absorb into the skin.


2. Apply your Lipstick

Now you're going to want to apply your lipstick/ corrector to the dark areas you wish to conceal. There are two things that will effect the choice of colour for your corrector. 1.the undertone of you skin - when you look at your wrist, if the veins you see there are blue in colour, you have a cool undertone. Likewise, if you look at the veins and they are green, you have a warm undertone. Secondly, the tone of the actual dark circles. What you want to try and do is pick a shade of lipstick that will neutralize the undertones in the dark circles. You do this by selecting colours that are opposites on the colour wheel


Blue toned dark circles tend to appear on people with cool undertone skin (orange corrector)
Green-blue toned dark circles tend to appear on people with warmer undertone skin (red concealer)
Apply your corrector of choice, and blend into the eye area with either a brush or sponge.

3. Set your Corrector
You're going to want to set the corrector you just used over the dark circles so that it doesn't mix into your concealer or foundation whe nyou apply those to the undereye area.
Use a fluffy brush to apply your setting powder of choice into your under eye area. Use a clean powder brush to dust away any excess powder that might be left behind.

4. Apply your Concealer/ Foundation
Lastly you're going to apply your concealer and or foundation as you normally would.


Voila! what under eye circles !?

Thanks for reading - I love to read what you think, leave me lots of comments ;D


Danielle


Saturday, 20 June 2015

How To: Contour and Highlight - Cream Edition

Hello Beauties,

Highlight and contour are so important for any makeup look, it helps to define and sharpen your bone structure, or can be used to create an entirely new face shape all together.

Contour can be used to change the shape of your nose, slim your face, define your cheek bones and even reduce a double chin. It is MAGIC!

While contour is meant to diminish/ hide, highlight is meant to brighten/ make more prominent. The more light that is forced into an area the more noticeable it will become.

I know that I've written a post in the past about highlighting and contouring; but th at was before the so called "Kim K" method using creams became so popular.

So, let's begin! How to do it in just 7 easy steps

You'll need:

- Moisturizer (I'm using Olay complete for normal skin)

- Foundation/ BB cream (I'm using rimmel stay matte in 100 fair ivory)

- Setting powder (I'm using MUFE HD powder)

- Cream concealer in 2 shade - one lighter than your skin tone and one darker (I'm currently using Cover FX in the lightest shade in the line and Tom Ford traceless foundation stick in 08 Caramel)

- RE-usable cosmetic sponge ( I use the faux beauty blender by QUO)

- Large powder brush (I'm using one by Pari)

- Highlight powder (I'm realyl fair, so I am using MAC mineralized skin finish in lightscapade)

- Blush or fan brush

- Contour powder (I use MAC blot powder in dark OR MAC always sunny pro long wear shadow)

- Contour brush ( again - Pari)


Step 1 - Prep your skin
Moisturize your face and allow the moisturizer to full absorb before you apply anything else. If you're going to use a primer, now is the time to apply it.

Step 2 - Apply your foundation

apply your foundation to your entire face as you normally would. Make sure you blend well.

Step 3 - Set your foundation
Apply your setting powder to your entire face. Once you've applied your powder, take a large CLEAN powder brush and sweep gently over your face again, taking away any excess that might be lingering

Step 4 - Contour
Find the hollows in your face/ places where shadows naturally occur - (Usually below the cheek boens - near the temples - forehead, near the hairline - sides of the nose - and below the jaw bone)- Apply your darker concealer in those areas and buff it out using your cosmetic sponge. You don't want to completely remove the colour, but you don't want any harsh lines.

Step 5 - Highlight
Look for areas on your face that light would naturally fall -(Usually the forehead, bridge of the nose, under the eyes, and cheekbones) - Apply your lighter concealer and then blend out with your cosmetic sponge. Again you don't want to completely take the colour away, but you don't want any harsh blocks of colour either

Step 6 - Contour...again
Now it's time to go back in with your contour powder and make sure that your contour is set and well blended. Remember that contour powders should be Matte to give you the best effect. While you can use a bronzer - you're better off using a matte powder or eye shadow to create depth in your contour.

Step 7 - Highlight....well you get the drill
Go back in with your highlight powder of choice and make sure that your highlight areas are set and well blended.


Flawless looking skin every time ;D


Thanks for reading lovelies, leave me comments and let me know if this helped you


Danielle


Wednesday, 17 June 2015

Makeup on the Move

Hello Beauties, 
It is said that a woman only needs 3 things with her to get "flirty on the fly", next time you head out, don't forget to throw this dynamic trio into your purse.


Bronzer - Will help give your skin a gorgeous summer glow, this hue also makes ALL EYE COLOURS POP!!! Simply sweep some over your eyelid with your finger. 
My Pick - Estee Lauder Bronze Goddess

Hand Cream - Apply your hand cream of choice over your hands and then run them through your hair. This will help smooth frizz and add shine.  Likewise you can rub it over your arms and legs to give your skin a sexy, glowy sheen.
My Pick - Bath and Body Works - Thousand Wishes (smells AMAZING, which seems like a great substitute to carrying perfume around)


Lipstick - swipe a peachy coral shade onto your lips and your cheeks.  Dab onto the apples of your cheeks and blend out with your fingers. 

My Pickestee lauder pure colour crystal lipstick melon or Lancome Rogue in Love in Jolis Matins


Hope this helps you for the summer weather a head. 

Thanks for reading beauties, 

Danielle


Review: Essence lash volume powder

Hello beauties,
I was out the other day at shoppers drugmart looking at different products that are sold for under $5.00 when I saw Essence Voumizing Lash Powder.
It was only $3.49, I looked at it, read the Ingredients and thought there is no way this will ever work. Lash products are usually WAY more money than this; how could something that retails for less than 5 dollars actually work.
The shoppers drugmart counter manager assured me it works and that she uses it all the time, so I bought it. I mean for less than 5 dollars, why not ?

I tested it as soon as I got home and guess what; it works wonderfully!
The powder adds both length and volume to your lashes. The powder is made of small fibrous pieces, it almost looks like cotton when you first open the container. These small pieces work to coat your lashes and act kind of like extensions.

The only real downside to this powder is applying it, because it is made of small fibrous pieces there is a tonne of fallout and if you get that fallout in your eyes it's not very comfortable.
Something else to be wary of when applying this product is clumping, if the powder builds up to much in one spot vs anther you'll look clumpy. Just make sure to apply this product with a very even hand and a clean spooly to avoid this issue.

I've also seen this powder called other things (ie vampire's love, around Halloween) But it is the same powder from the same line, and it is pretty amazing. A must have beauty buy for under 5 bucks.


Before and after


Thanks for reading beauties, 

Danielle


Monday, 7 April 2014

How To: False Lashes


Hello Beauties,


False lashes are that part of a makeup routine that most people skip over, because most seem to think that they can't pull them off, or just can't put them on. They're almost always a part of youtube tutorials and most beauty experts tend to skip over the application.


I just want to let you guys know that falsies can be done quickly, easily and correctly, whether you're a seasoned pro or just a lover of thick, lush lashes ;D


So, what are false lashes


Falsies, or fake eyelashes, come in many different shapes and styles. They are applied to the lash line of the eye to create the illusion of longer, fuller, and darker lashes. They are meant to blend in with your natural eyelashes. You can get simple natural looking ones for everyday use, dramatic full lashes, or flirty oddly shaped ones. You can even find lashes that are made of feathers, feature bright colour, or crazy patterns.


False lashes can be made out of synthetic (plastic) material, or natural hair. Less expensive lashes tend to be synthetic, they're easy to tell apart because they actually look a little shiny and are stiffer, Natural hair lashes look just like real eye lashes. They're usually made from treated, sanitary hair and blend in flawlessly with your natural lashes.


There are two main types of lashes - Band/ strip lashes and individual lashes. The two have very different application styles, but both are very doable.


Band False Lashes:


These are by far the most popular type of lashes because they're quicker and easier to apply to yourself. They are a full eye's worth of lashes, pre-attached to one another, making them easy to just glue and go.


Individual False Lashes:


Individual lashes are ideal for occasions where you want the extra drama, but definitely don't want the look of a full band of false lashes. Each individual lash is a small clump of lashes stuck together, meant to be glued one at a time into the lash line for optimal blending. These type of lashes look the most natural, but are a lot more time consuming to put on yourself.


How do you Apply False Lashes ?


Applying falsies isn't something that you're going to be able to do perfectly the first time (just ask the girls I practiced on in my makeup application class) It's much better to practice a few times before being able to go out in public donning your new luscious lashes.


This is the way that I was taught to apply falsies, and I've found that it works well for most people.  


You Will Need:
  • Scissors
  • Eyelash glue
  • Black mascara
  • Eyelash curler
  • Tweezers


1. For strip lashes - You MUST measure and trim any excess off the band before you apply them. Not everyone has the same shaped eyes, this will help give you the best fit AND make your bank look the most natural.


2. Curl your lashes and apply a single even coat of mascara, this will make it easier to blend your natural lashed with the falsies. Take the lashes out of the package and curl them around your finger. This will make the band more pliable and easier to shape to your eye.


3. Lots of falsies come with eyelash glue (usually the glue is not the greatest though) make sure you double check to see if they set you picked does or does not BEFORE you get them home. There is nothing worse than getting home and finding out you have no way of attaching your lashes and starting your new adventure into lash town. You can usually buy inexpensive lash glue on it's own. When it's time to apply the lashes  I squeeze a small dollop of glue onto my makeup pallet and then grab the lashes upside down and run the band quickly through the glue. This usually coats the band in a thin even layer of glue. For individual lashes you'll want to use tweezers to dip the knot at the bottom of the group of hairs into the glue.  


4. Allow the glue to set on the lashes for about 15 seconds before you apply them to your eyes. This will allow the glue to become tackier and will help the lashes set faster.


5. With your fingers or tweezers if you're more comfortable with them, apply the lashes to the inner corner of your eye, as close to your natural lash line as possible. Applying on the inner corner makes it easier to follow the natural curve of your eye, and allows you to get as close as possible to your natural lashes.


6. Once the lashes are applied and have dried, use an eyelash curler on your natural and false lashed to blend them further, and add one more coat of mascara. This will help hold the curl and make sure the two stay blended together - Think like hairspray for your lashes.


(Individual lashes aren't as tricky to apply, even though the process takes  a little longer. You don't have to worry about measuring and trimming the lashes. Most people will apply a few individual lashes to their outter lash lines to make their eyes appear bigger without looking like it's to much. You can also use individuals on your lower lash line.)


Q&A


How do I remove falsies without yanking on my eyelids ?


Using a good eye friendly makeup remove is key. You don't always have to, but the tugging on the eyelid can be unpleasant for some people when they try to take their lashes off, Try using a makeup remover with oil in it, instead of an oil free formula. If you don't want to run out and buy another product,  try olive, or coconut oil. The natural oils will not cause any break outs, and a lot of people have them already in the pantry.


Can you Re-Use Falsies


Yes! you definitely can, as long as you remember to clean and sanitize them. You can get a lot of life out of your lashes, especially synthetic ones. Whenever you remove your lashes, just remember to remove all the makeup/ excess glue off of them, then give them a swipe with a q-tip that has been dipped in rubbing alcohol. Let them dry and then put them away for next time. You can use them until they literally fall apart ( and sometimes even after that...hello demi's)


My Favourites:


Some of my favourite falsies are made by Ardell, they have a HUGE variety to choose from, they really last AND are affordable.


For individual lashes I like the Ardell Duralash kit. The lashes can last up to 2 weeks with the special adhesive that is included in the starter kit.
My go to lash glue is DUO, it comes in a few different formulas, I like the formula that dries clear
The house of lashes glue is also amazing, the brush applicator makes it very easy to apply just the right amount of glue to the band.


I hope that you all find this very helpful and that you enjoy your adventures into luscious lash town.


Stay Beautiful,


Danielle


Tuesday, 4 February 2014

Review Time - Bellato HD Skin Secrets Starter Airbrush Kit

Hello Beauties!!

I recently took the plunge and purchased an airbrush kit from Belletto Studio.
I found a great coupon code from one of the very talented makeup artist's that I follow on Instagram.  The coupon code gave me 50% off of any item on the site.

I started by reading some of the reviews that other people had posted and watched some videos on Youtube, then I went onto the website to look at what kind of systems that Belletto offers.  I decided to get the HD Skin Secrets Starter Kit, this particular kit includes:

  • Complete Belletto Studio HD Airbrush System
  • A mix of 4 Foundations, 1 Blush, 1 Bronzer or Highlighter pre-selected for you based on your skin tone.
  • Lifetime Manufacturer’s Warranty and Maintenance on Airbrush Wand
  • Belletto Studio Artist Support
  • One-Year Manufacturer’s Warranty
  • Quick Start Guide
  • Step-By-Step Tutorial DVD:
Learn to Airbrush
Basic and Advanced Makeup Applications
Contouring & Highlighting
Stencils for Face and Body
Cleaning and Maintenance
Airbrush Tanning


ORDERING


I found the website fairly easy to navigate and order from, adding the coupon code was a little strange, you have to go to a separate page to add the coupon to your order, and had I not been looking for it, I probably would have missed it entirely.

 I live in Canada, so there was only one option for shipping, but it was very reasonable. In total having used my coupon and added shipping, my total order was $92.50 (USD) which worked out to $104.50 (CND).

I was a little confused as to how long it would take for me to receive my order because no where on the site or in the confirmation e-mails does it mention shipping times, which I was a little worried about.

However I have to say my order arrived in really good time, I was very pleasantly surprised with how quickly it did arrive and they followed the special shipping directions I added perfectly.

UNBOXING


The box has a flap magnet closure, and on the inside of the lid there is a "periodic table of makeup" which is very helpful for mixing colours. All of the directions that come with the system are step by step and very easy to follow. 


First Impressions


The compressor is very compact and would be easy to carry, which is perfect for me as I travel to clients, and can now offer them airbrushing on the go.  The system is very easy to set up, and has three settings to choose from low, medium and high. There is no on / off switch, the compressor begins blowing as soon as the power cord is plugged in. 

The foundation covers really well, and feels incredibly light while still looking natural which I especially love.  The blush that was included with my system was not a colour I would really use, but it is still a beautiful blush colour for a different skin tone. 

Overall it is a very easy system to use and I am very happy with my new purchase. I would highly recommend it for anyone who is new to air brushing. 

★★ ★ ★ ☆


Danielle